
Contacts List
The contacts list is one of the most important things on your
HUAWEI smartphone, helping you
stay in touch with your family, friends or business partners.
It is where you save contact information for the people you
know, such as their
phone numbers, email addresses or other relevant data.
And as you have more and more contacts saved on our device, you need
to easily manage them. Here is how you can quickly
search, create or delete contacts, export them or organize them
in groups.
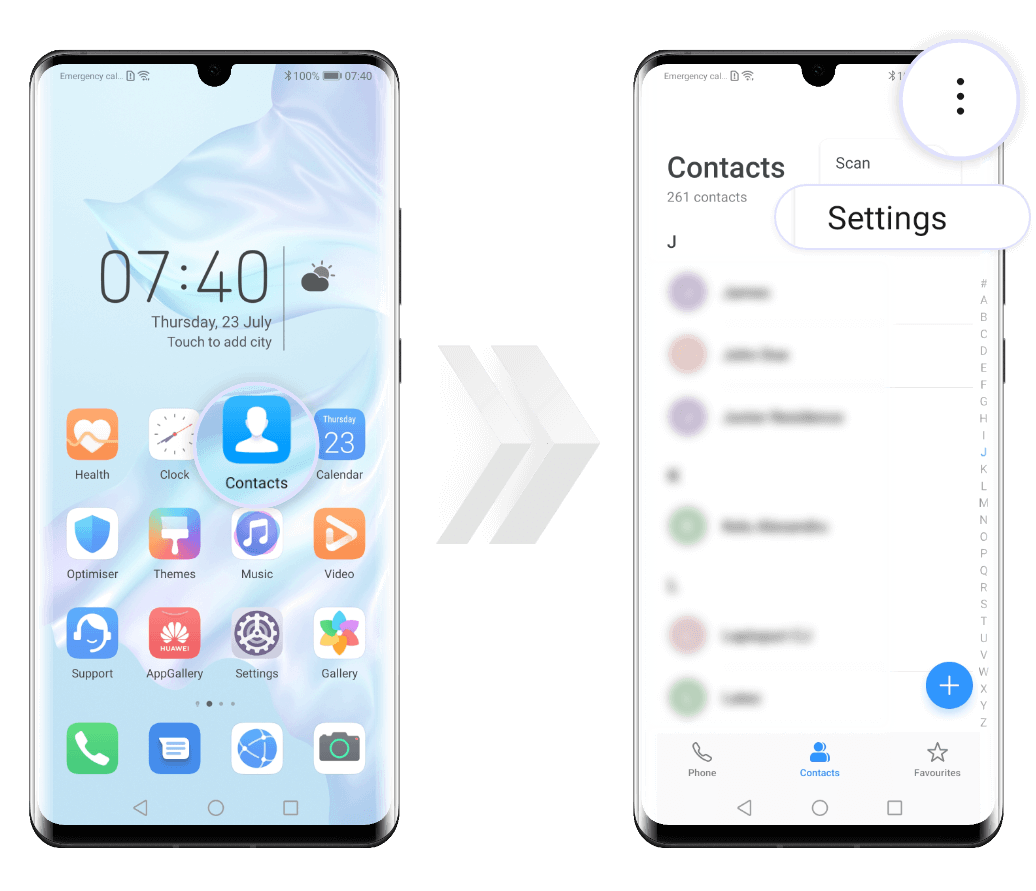
Search contacts
If you want to quickly find a contact, go to Contacts,
tap  >
Settings > Display preferences.
>
Settings > Display preferences.
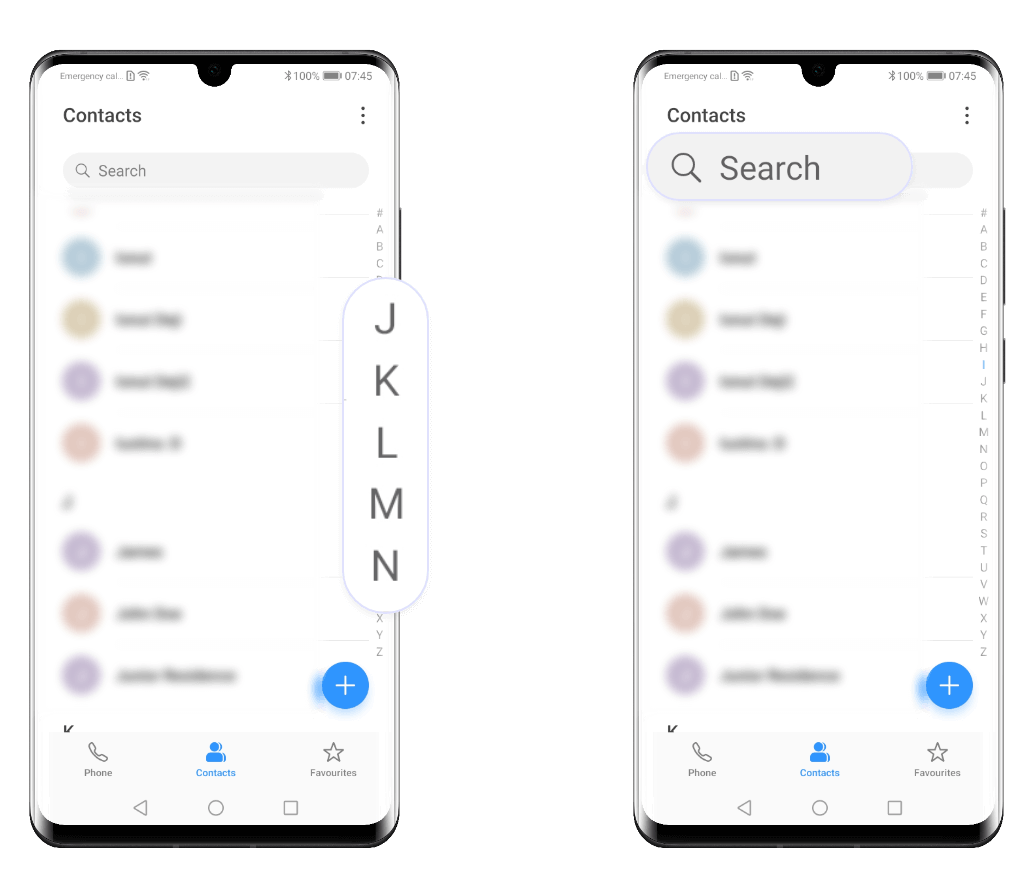
Here select All contacts to make sure
all the entries are visible. Now you can
look for a contact using one of the following methods:
- drag the index on the right to
scroll thorough the contacts list.
- in the search bar at the top of the list
enter the contact's name, email address or other relevant
keywords. The matching result will be displayed below the search bar.
When you find the contact you are looking for,
tap on it to view its details.

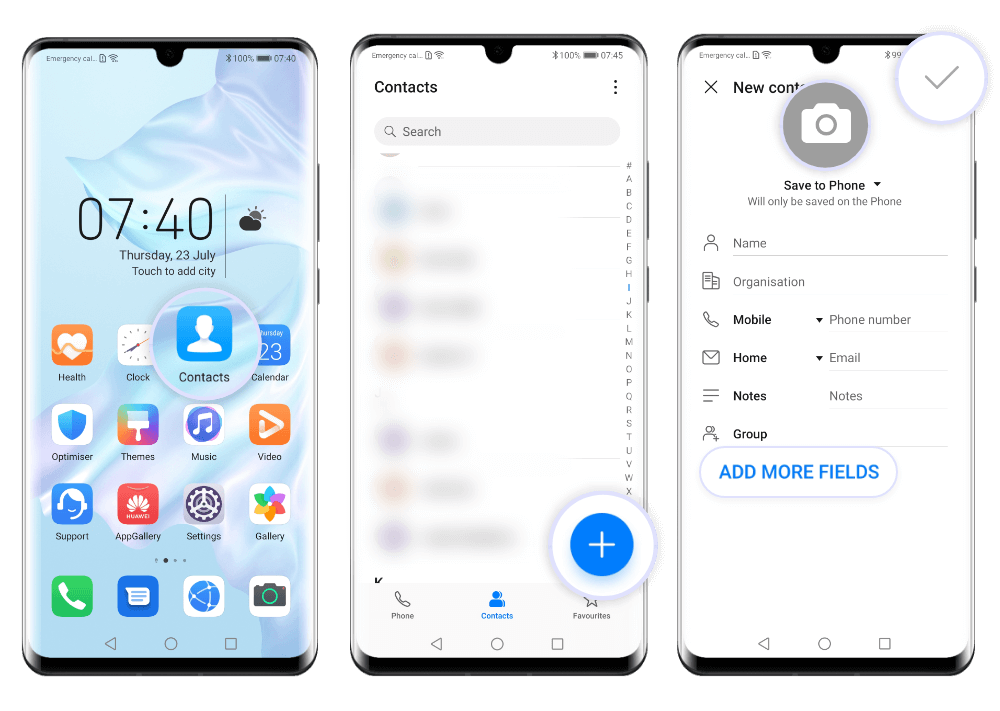
Create contacts
To add a new contact, open the Contacts list and then
press  . If you are
creating a contact for the first time, tap
Create new contact to start adding a contact.
. If you are
creating a contact for the first time, tap
Create new contact to start adding a contact.
Now you can enter the contact information, such as the
name, the phone number or the email address. Touch the
camera icon  to
set a profile picture for the contact or select
ADD MORE FIELDS if you want to enter more details.
to
set a profile picture for the contact or select
ADD MORE FIELDS if you want to enter more details.
When you are finished, tap
 to save the contact.
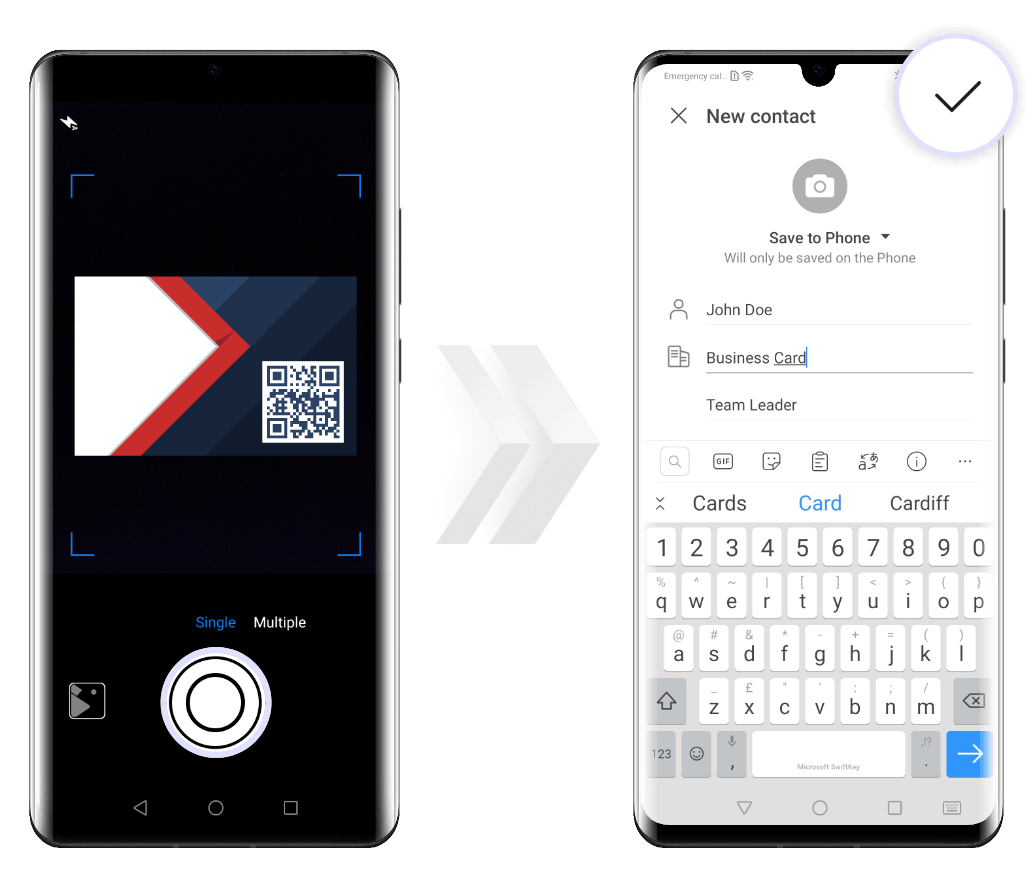
Scan business cards to add contacts
You can add a contact to your device directly from a
business card.
On the Contacts screen, tap
> Scan or go to
Business cards > Scan.
Place the business card on a
flat surface, adjust the camera so all the data on the card
is clearly displayed in the viewfinder, select Single or
Multiple takes and touch
 to capture an image.
After the photo is taken, the device will
automatically identify the contact information. Tap
to save the contact. You
can view all the scanned business cards on the
Contacts scree, in the Business cards section.

Scan QR codes to add contacts
If you want to add a contact using a QR code, open the
Contacts screen, tap
> Scan or go to
Business cards > Scan.
Take a photo of the QR code or select a photo of a QR
code from Gallery. The device will
identify all the information contained in the QR code and
will automatically add a contact in the contacts list.

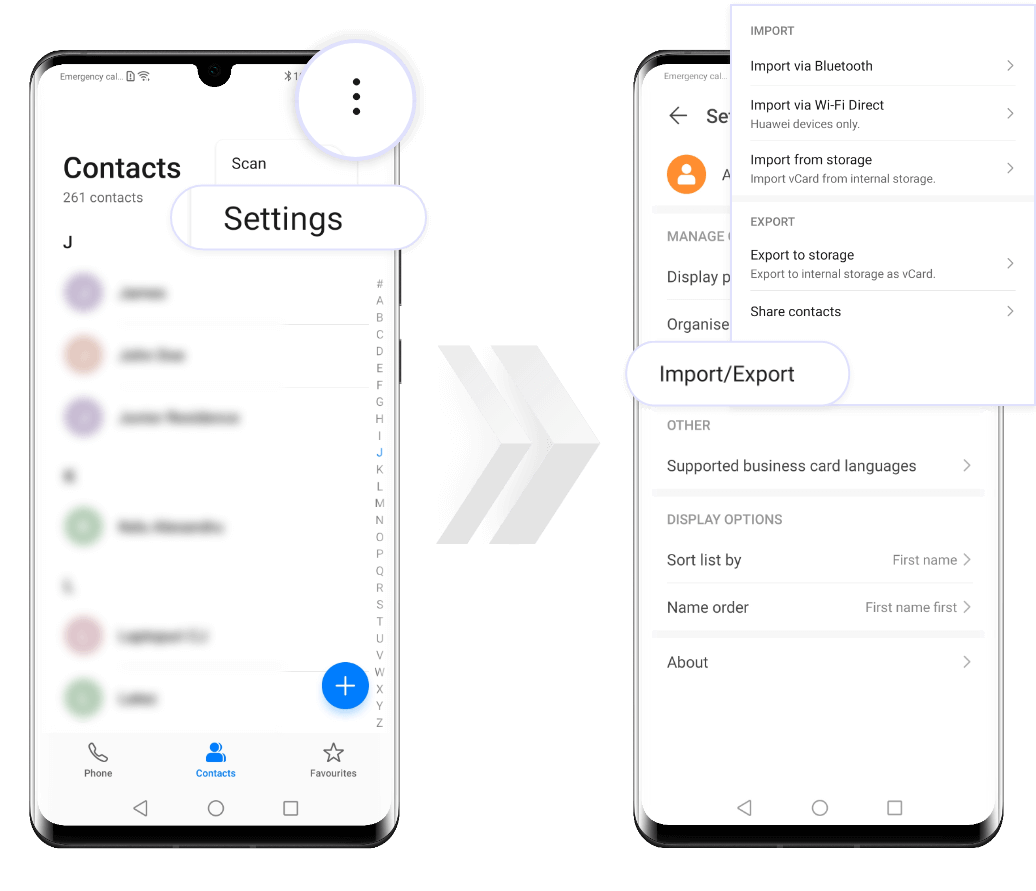
Import, export and share contacts
You can easily add contacts from other devices or from
the internal storage of your smartphone. Go to the
Contacts screen, tap
> Settings and
select Import/Export.
Here choose one of the import options (via Bluetooth, via
Wi-Fi Direct or from the storage) and
follow the onscreen instructions to complete the process.
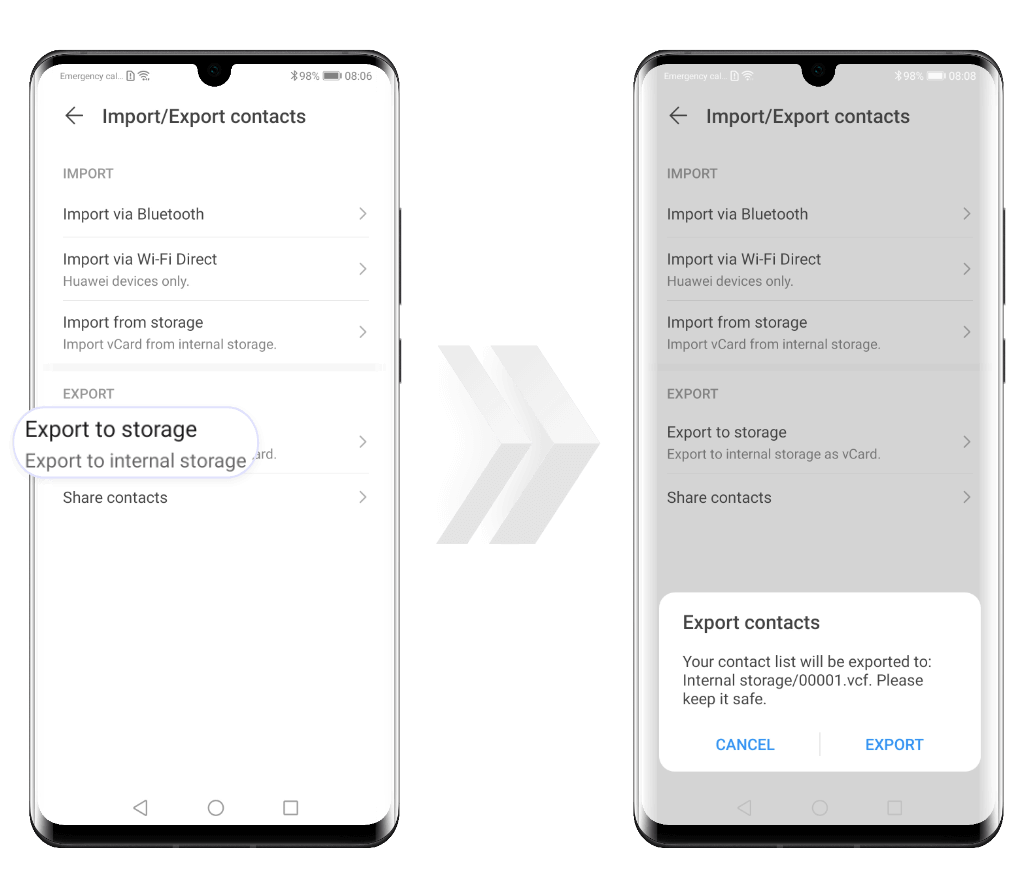
To export contacts to the internal memory of your device, in
the Import/Export menu tap Export to storage and
follow the onscreen instructions to complete the process.
The exported .vcf files are saved in the
root directory of your device's internal storage by default.
You can open Files to view the exported contacts.
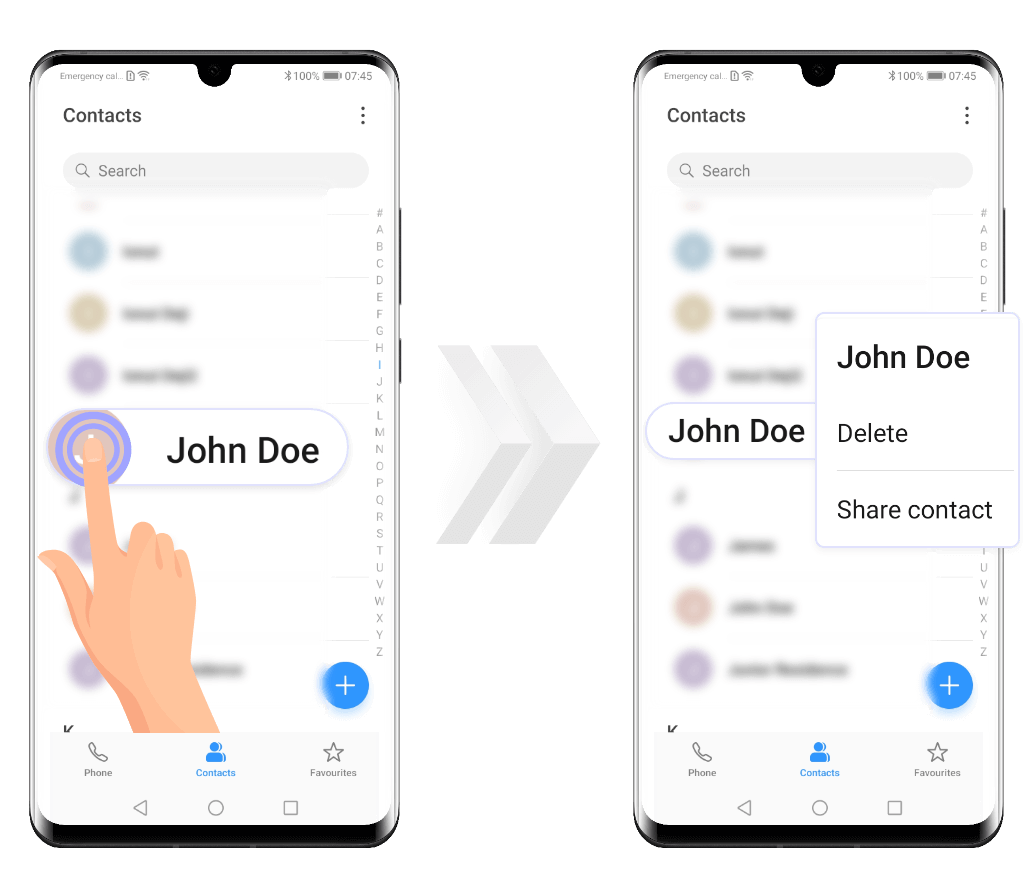
Share contact
If you want to send a contact to someone, go to the
Contacts screen and select the entry you want to
share. Tap >
Share contact and choose a sharing method.
Then follow the onscreen instructions to share the contact.

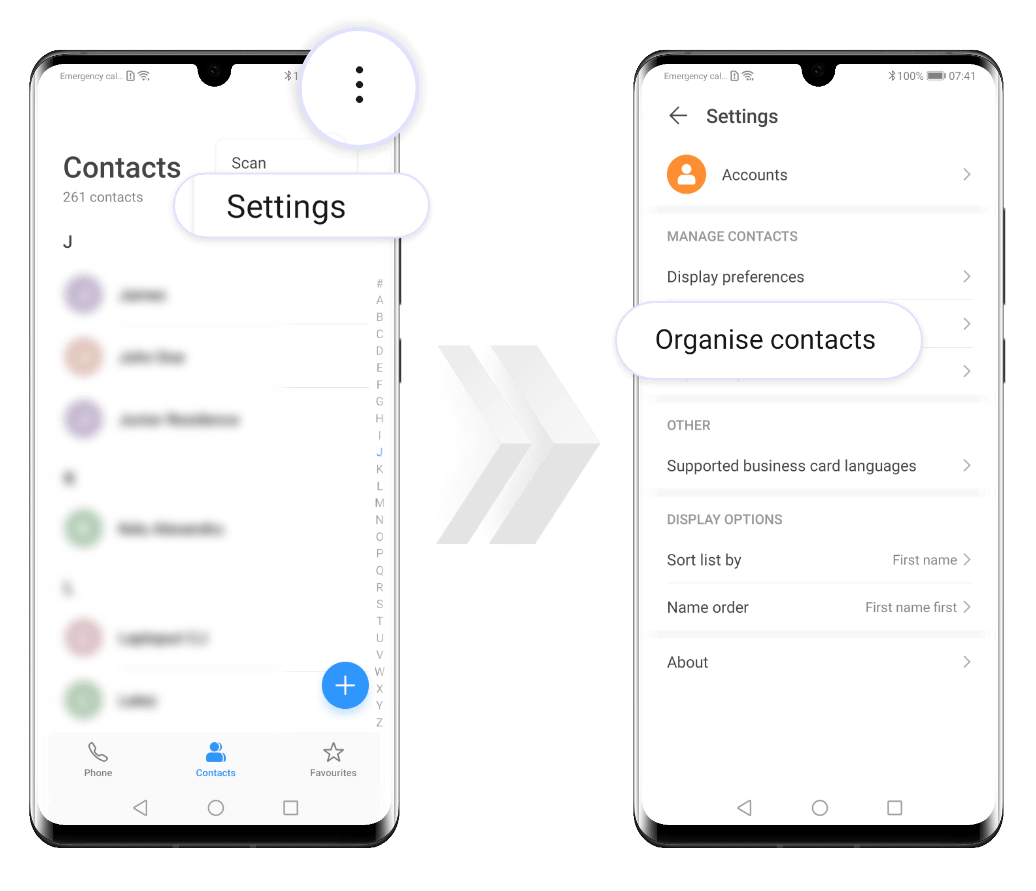
Merge contacts
If you have duplicate contacts, you can
merge them into a single item.
From the Contacts list screen, tap
> Settings >
Organize contacts.
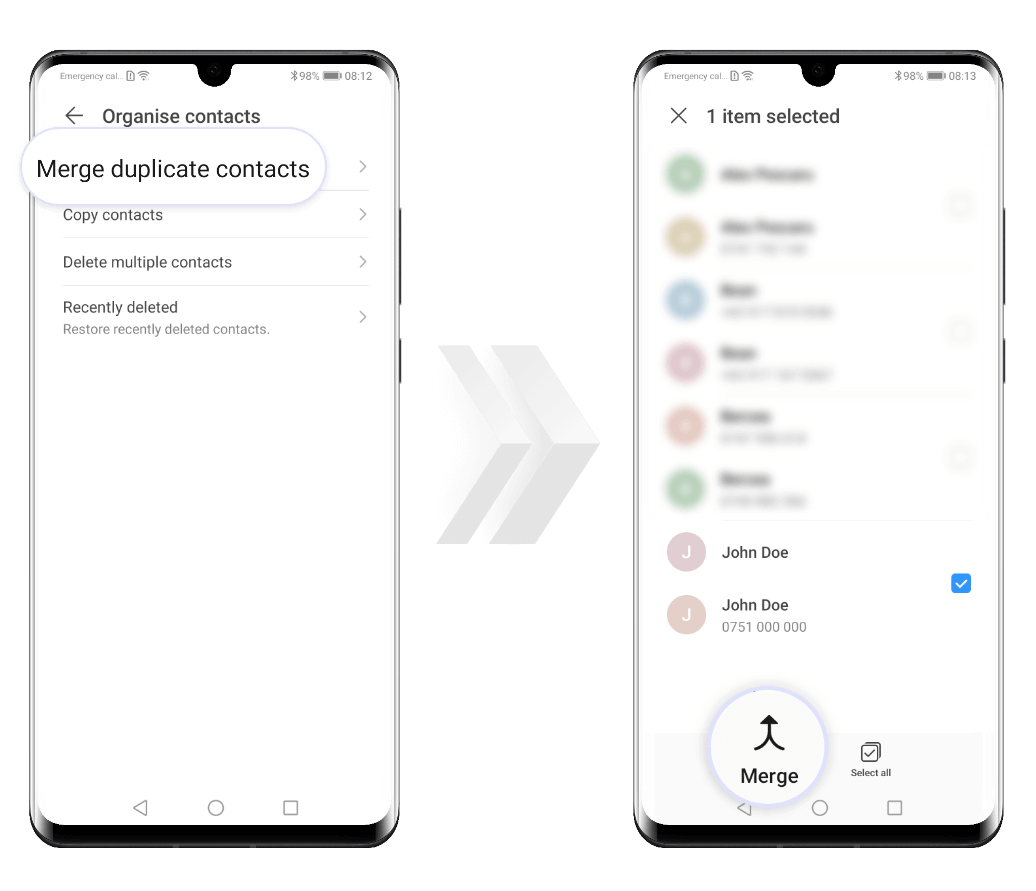
Here choose Merge duplicates contacts and a list of the
duplicates contacts will appear. Select the entries you want
to unite and touch Merge.
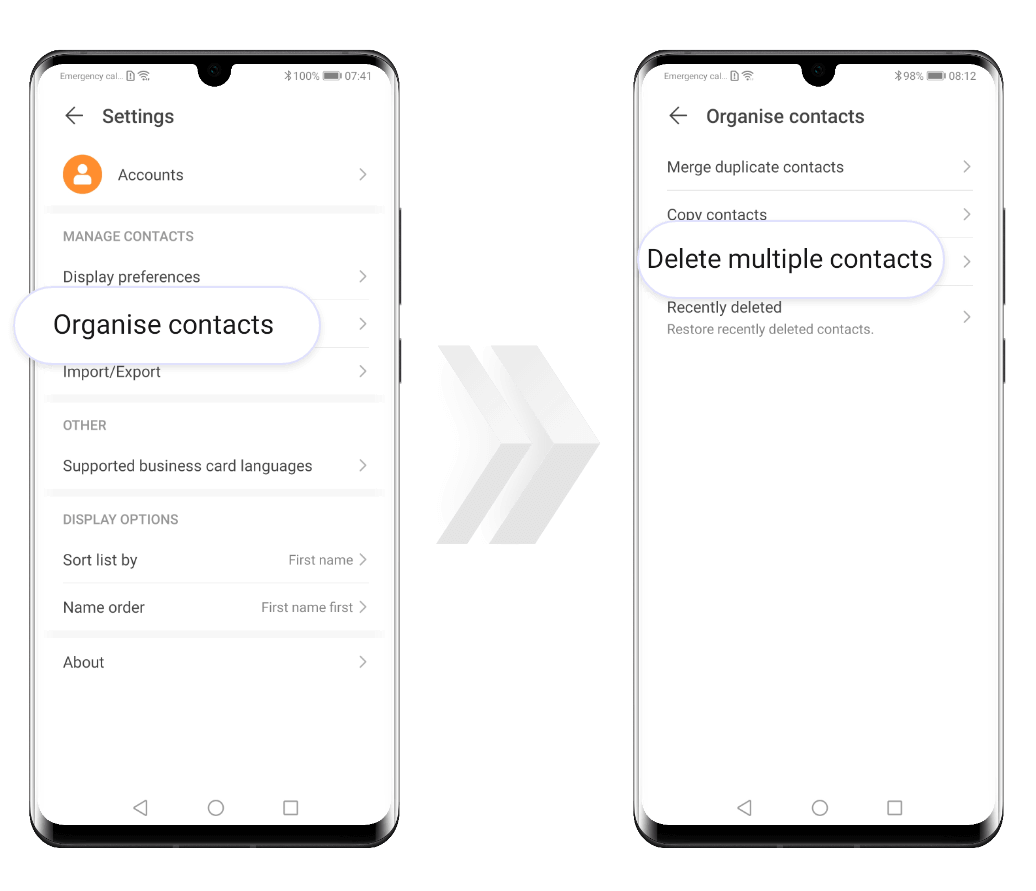
Delete contacts
You can delete a contact you do not need anymore using one of
the following methods:
- from the Contacts list screen, tap and hold on the
entry you want to remove, then touch Delete.
- on the Contacts screen, go to
> Settings >
Organize contacts. Tap Delete multiple contacts and
select all the entries you want to remove. Touch
 to finish the process.
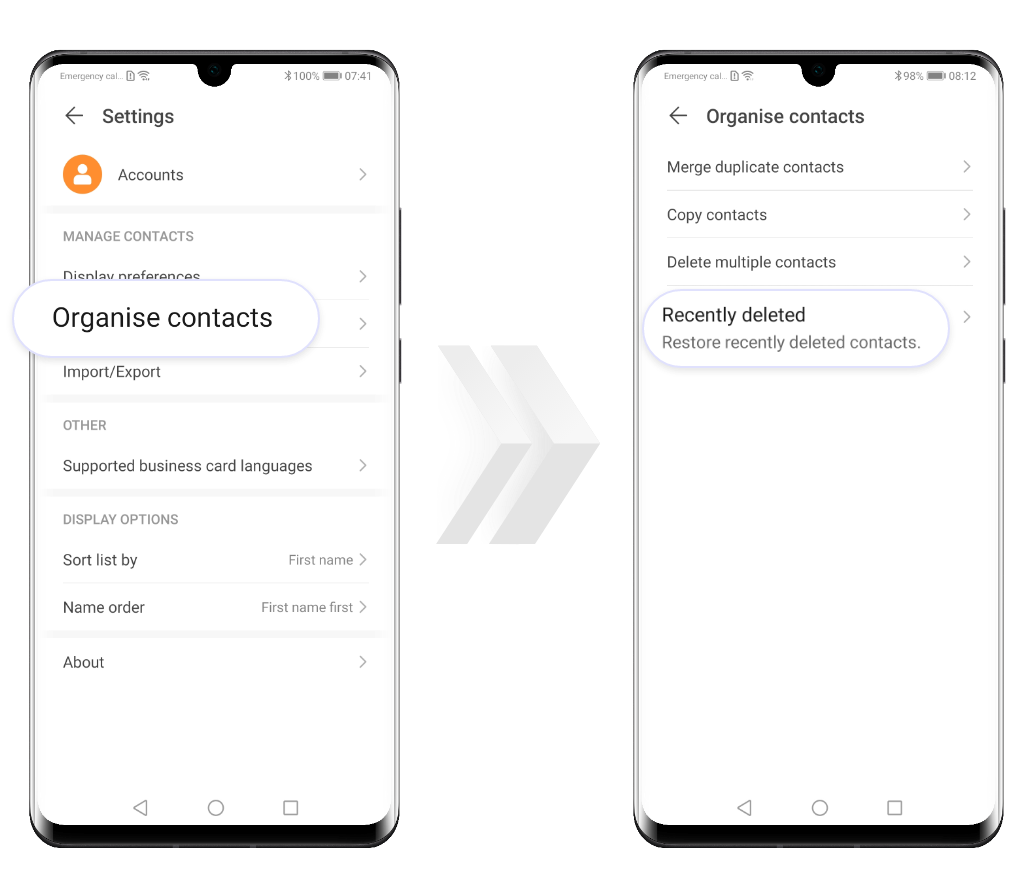
Restore contacts
You can easily restore the deleted contacts.
Go to
> Settings >
Organize contacts and tap Recently deleted.
Touch and hold on a contact you want to restore,
select all the entries you want to recover and press
 to restore them to the
contacts list.
to restore them to the
contacts list.

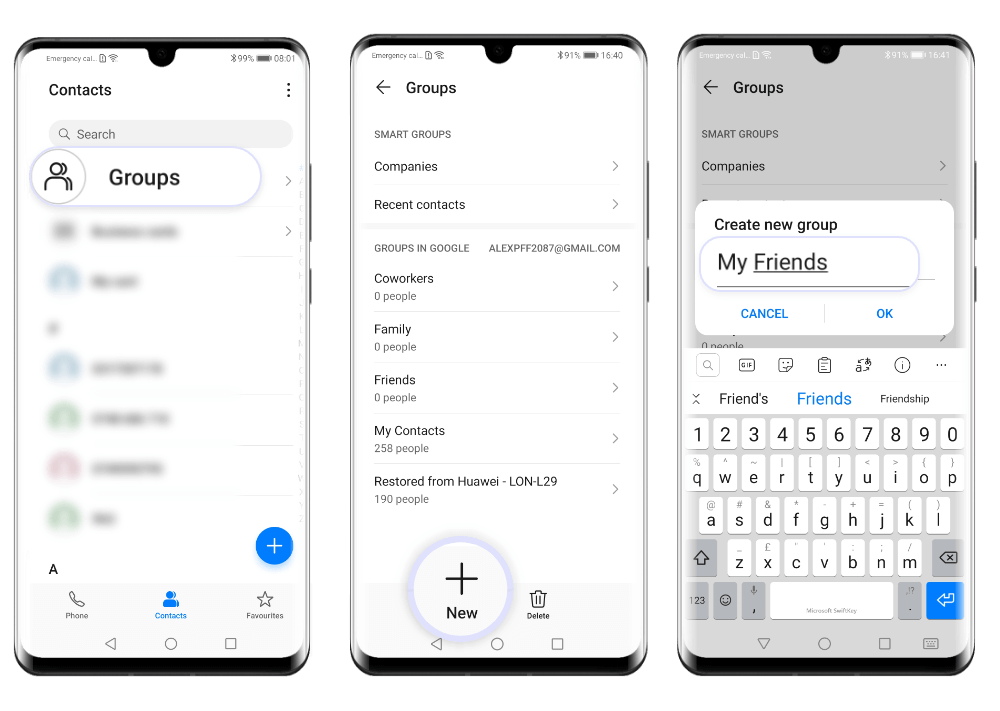
Create a group
If you want to conveniently
send emails or messages to multiple contacts in the same
time, you can use a contact group.
Your device
automatically organizes your contacts in groups based on the
company name, location or last contact time, but you can also
create new groups according to your preferences.
To create a group, go to the Contacts screen and select
Groups.
Tap  ,
enter the group name (for example "Friends", "Family",
"Colleagues") and touch OK. Now
follow the onscreen instructions to add contacts to
the group, then press
to finish.
,
enter the group name (for example "Friends", "Family",
"Colleagues") and touch OK. Now
follow the onscreen instructions to add contacts to
the group, then press
to finish.
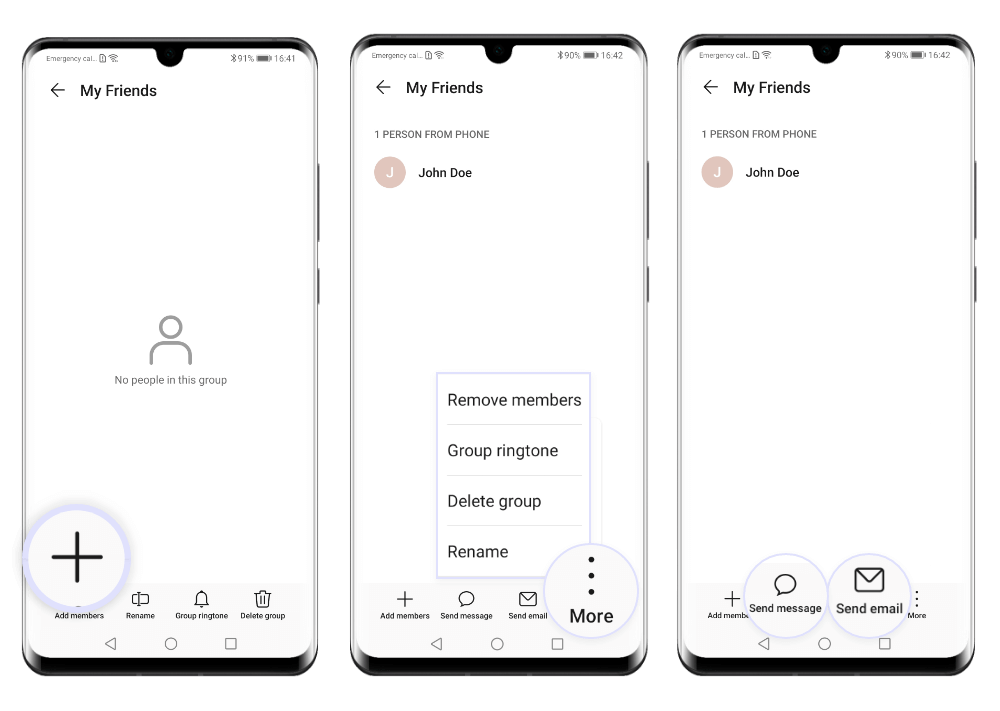
Edit group
You can later add new members to a group or
edit its details.
On the Groups screen select the group you want to
modify and tap to
add a new contact.
Press if you want
to remove group members, set a group ringtone, delete or
rename the group.
When you want to send a group message or email, go to the
Groups screen and open a group. Tap
 to send a message or
touch
to send a message or
touch  to send an
email to all the group members.
to send an
email to all the group members.
Manage VIP contacts
You don't want to miss any email from your business partners? Add
their contact details to the VIP list and your device will
automatically copy the emails received from them to the
VIP mailbox.
You can add VIP contacts using one of the following
methods:
- open the Email app and tap
> Settings >
VIP contacts. On the VIP list screen, touch ADD and
either create a new contact or add one from the
contacts list. Then follow the onscreen instructions to
complete the process.
- open an
email, tap on the name of the sender or of the receiver and
then select Add to VIP list.
If you want to remove someone from the VIP list, open the
Email app and go to
> Settings >
VIP contacts. Here select the entry you want to delete
and touch .